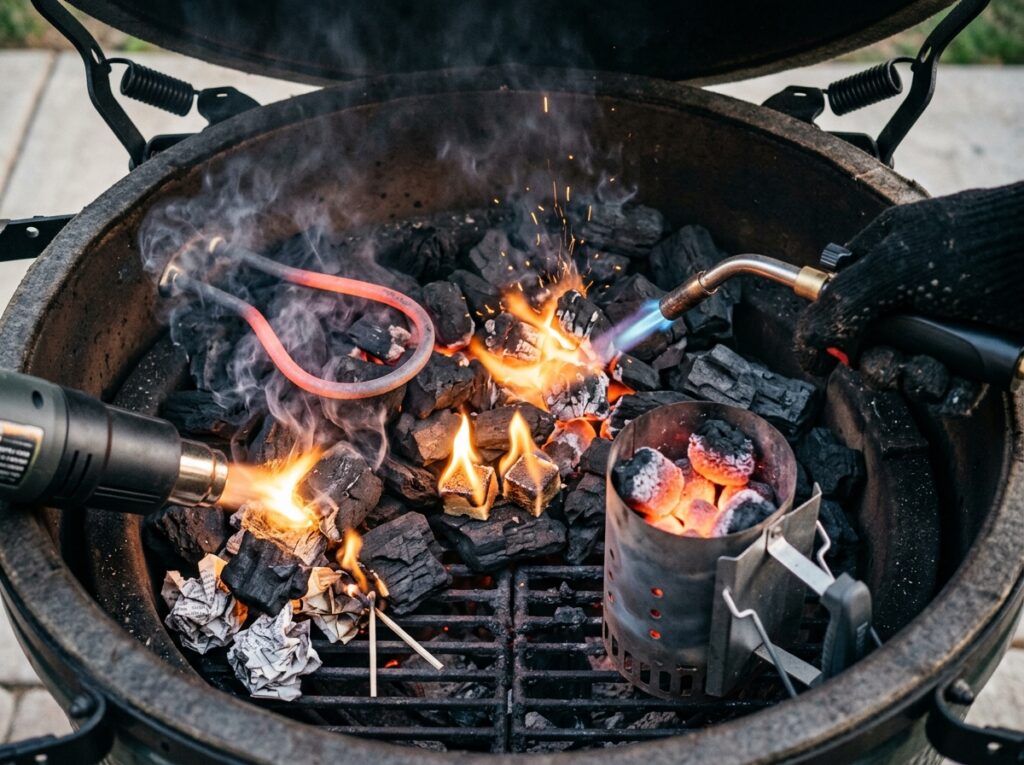
Most kamado grills get harder to control when you start with too much fire, not too little. If you’ve ever tried to smoke ribs at 250°F and watched your Big Green Egg or Kamado Joe climb way past your target, you already know the problem. The fix is simple: use the right lighting method, in the right spot, for the kind of cook you want.
These 6 ways to light a kamado grill will help you start clean, stay safe, and build a fire that actually works for low-and-slow barbecue, weeknight grilling, or a ripping-hot pizza session.
3. Full Content
Before You Light Your Kamado
A kamado grill is a charcoal cooker with thick ceramic or insulated walls that hold heat extremely well. That’s why a kamado can smoke for hours on a small fire, and also why it can run away from you if you light too much charcoal at the start.
Whether you own a Big Green Egg, Kamado Joe, Primo, or Vision Grills model, the basic idea stays the same. You’re not trying to build a bonfire. You’re trying to create a controlled fire that grows at the speed you want.
Before using any of the methods below, do these four things:
- Clear out old ash so air can move through the firebox.
- Fill with dry lump charcoal, not wet leftovers from last month.
- Open the bottom vent fully and open the top vent wide enough for strong airflow.
- Make a small well in the charcoal where your heat source will go.
Most kamado owners prefer lump charcoal because it usually makes less ash than many briquettes and responds faster to vent changes. It also fits the way a kamado cooks. Bigger chunks at the bottom and medium pieces on top usually work best.
Quick Fact: If you want low-and-slow heat, light one small spot. If you want high heat for steaks or pizza, light two or three spots.
Warning: Skip lighter fluid and instant-light charcoal. They can leave a chemical smell on food and create messy flare-ups inside a tight cooker.
If you’re still shopping for a ceramic cooker, our guide to the best kamado grill can help you sort through the main options.
6 Ways to Light a Kamado Grill
There isn’t one “perfect” way for everyone. Some people want the easiest method. Some want the fastest. Some just want a clean fire with no extra gear. Here’s how each option works, where it shines, and where it can annoy you.
1. Light It With Fire Starter Cubes
Starter cubes are the easiest place to begin. Most are made from paraffin wax, sawdust, or compressed natural material. They’re cheap, easy to store, and simple to use.
Set one cube in the well you made in the charcoal. Then place two or three small pieces of lump around it, but don’t smother it. Light the cube and leave the lid open for several minutes. Once the edges of nearby charcoal start glowing and you see clean heat instead of thick white smoke, close the lid and start managing the vents.
This method works especially well for low-and-slow cooks. Why? Because it starts small. A small fire is easier to hold at 225°F to 275°F than a giant one.
If you’re planning ribs, pork butt, or brisket, patience pays off. A slow rise in temperature makes it much easier to hold a stable cook later. That’s the same kind of steady fire you want for recipes like this 3-2-1 ribs guide.
The only downside is speed. Starter cubes aren’t the fastest option, and on a windy day they can take a little longer to get a good bed of charcoal going. Still, for beginners, they’re hard to beat.
Pro Tip: For a 250°F rib cook, use one cube in the center. For a 400°F roast chicken cook, you can light two spots instead of one.
2. Use Natural Wood Wool or Tumbleweed Starters
Wood wool starters, often called tumbleweeds, are little nests of wood shavings dipped in wax. Think of them as the more natural cousin of a starter cube. They catch quickly, burn clean, and don’t need much fuss.
Tuck one under a few small charcoal pieces or wedge it between lumps near the center of the pile. Light the edge and let it burn with the lid open until the nearby charcoal catches.
A lot of backyard cooks like this method because it feels simple and clean. No cords. No torch. No bulky chimney. Just light it and go.
They’re great for everyday grilling. If you’re throwing on burgers after work, a tumbleweed starter gets the fire going with almost no setup. They also store well, which matters if your grill gear lives in a shed or garage.
One thing to watch: don’t bury the starter too deep. It needs some air around it. If you pack charcoal tightly over the top, the starter may burn out before the lump fully catches.
Common misconception: More starter material doesn’t always help. Two or three tumbleweeds for a low-temp cook can create too much lit charcoal and push the kamado hotter than you planned.
3. Use an Electric Charcoal Starter
An electric charcoal starter uses a heated metal loop or wand to ignite lump charcoal. You plug it in, set the hot end into the charcoal, and let the heat do the work.
It’s a nice choice if you want a very controlled start without open flame. Place the hot element in one spot, let it heat the lump for several minutes, then remove it carefully once the charcoal starts glowing.
You’ll need an outdoor-safe power source and a little patience. It’s not slow, but it’s not torch-fast either. What it does give you is precision. That’s handy if you’re trying to hold lower smoking temperatures and don’t want the fire spreading too quickly.
This method also keeps your setup pretty clean. No extra paper, no wax starter ash, and no gas bottle to deal with.
The main drawback is the hot metal. Once you pull the starter out, it stays dangerously hot for a while. You need a safe place to rest it, away from feet, pets, and dry surfaces.
Warning: Keep a pair of heat-resistant grill gloves nearby. Electric starters do the job well, but the business end stays hot enough to cause trouble long after you unplug it.
Electric starters are a strong pick for people who cook on a deck or patio and want a steady, repeatable routine. Plug in, light one spot, wait, and you’re ready to roll.
4. Fire It Up With a Propane or Butane Torch
If speed matters most, a torch is tough to beat. A propane torch lights lump charcoal fast, and it gives you great control over exactly where the fire starts.
Aim the flame at one area of charcoal for low-and-slow cooks, or hit two to three spots if you want to build heat fast for steaks or pizza. In most cases, you only need about 45 to 90 seconds per spot. You’re looking for glowing edges and a few sparks, not fully blazing coals.
Then stop. That’s where many people mess up.
They keep blasting the charcoal long after it’s already lit. That creates a larger fire than they need, and a kamado holds onto that heat like a cast-iron pan. Ten minutes later, the dome thermometer is still climbing and they’re wondering what went wrong.
A torch is one of the best choices for high-heat cooking. It’s also very good in damp or windy weather, where small flame starters can struggle.
If you want a dedicated setup, here’s a helpful look at the best propane torch for grilling.
Pro Tip: For a pizza cook around 600°F, light three spots in a triangle pattern. For a pork shoulder cook at 250°F, light one spot and let the ceramic do the rest.
Warning: Keep the lid open while using the torch, and don’t lean your face over the firebox. A torch makes lighting easy, but you still need to respect the flame.
5. Use a Hot-Air Charcoal Lighter
A hot-air charcoal lighter, like a Looftlighter-style tool, uses superheated air instead of a direct flame. You hold the tip close to the lump charcoal until it starts sparking and glowing, then pull back slightly so the hot air keeps feeding the ember.
It’s a smart middle ground between a torch and an electric starter. You don’t need starter cubes, and you still get a pretty quick light. Many kamado owners like it because it feels clean and controlled.
For low-and-slow, start one small patch. For grilling or searing, move to another spot once the first section catches. The tool gives you solid control over how much charcoal you light, which is a big deal on a kamado.
The trade-off is price and power. Hot-air lighters cost more than cubes or tumbleweeds, and they need electricity. You also need to stand there holding the tool, which some people don’t mind and some definitely do.
Still, if you grill often and want a no-fuel method that works fast, this is a strong option.
Did you know? A hot-air lighter often creates a very clean start because you’re igniting the charcoal directly instead of burning a separate starter under it.
6. Start the Charcoal in a Chimney Starter
A chimney starter isn’t the most common kamado method, but it works. You light charcoal in the chimney, let it catch outside the cooker, then pour the lit coals into the kamado.
This can be useful if you want a bigger bed of lit charcoal fast, especially for high-heat cooks. It’s also handy if you’re working with a large kamado, like a Big Green Egg XL, and you want to get a lot of lump going in a hurry.
The catch is control. A chimney creates a lot of lit charcoal all at once. That’s fine for burgers, steaks, or pizza. It’s not great if your goal is 225°F for an overnight brisket. A kamado that starts too hot can take a while to calm down.
If you use a chimney, fill it partially with lump charcoal rather than stuffing it full. Once the top pieces show glowing edges and some gray ash, pour them into the firebox gently. Then add unlit lump around or above them if needed.
Be careful here. Ceramic parts don’t like being banged around, and you don’t want to drop hot charcoal from too high.
Warning: A chimney is hot, awkward, and easy to fumble if you rush. Use gloves and set your footing before you pour.
A chimney makes the most sense for cooks where speed matters more than fine temp control. For slow barbecue, the earlier methods usually give you a smoother start.
How to Choose the Right Method for Your Cook
If all six methods work, which one should you actually use? The easiest answer is to match the lighting style to the food.
Here’s the short version:
- For low-and-slow barbecue: starter cubes, wood wool starters, or an electric starter
- For weeknight grilling: cubes, tumbleweeds, hot-air lighter, or torch
- For steaks and pizza: torch, hot-air lighter, or chimney starter
- For windy or damp weather: torch or electric starter
- For the simplest beginner setup: starter cubes or wood wool starters
Picture two real cooks.
You’re smoking baby back ribs at 250°F. You want a small, centered fire that grows slowly. One cube or one tumbleweed does the job nicely.
Now switch to pizza night. You want the cooker ripping hot, with more charcoal lit across the firebox. A torch in three spots or a small chimney of lit lump gets there much faster.
That’s the part many articles skip. The best way to light a kamado grill depends on the temperature you want later. Fast isn’t always better.
If you own a model with built-in ignition, like some newer kamado-style cookers, the same rule still applies. Light one area for low heat. Light multiple areas for high heat.
Once your grill settles in, food accuracy matters too. A good fire gets you close, and a solid instant-read thermometer helps you finish the cook with confidence.
Common Mistakes That Make a Kamado Hard to Light
A kamado is simple once you understand airflow. Most lighting problems come from a few repeat mistakes.
You Left Too Much Ash in the Firebox
A kamado breathes from the bottom vent up through the charcoal. Old ash blocks that path.
If your grill struggles to catch, dies early, or won’t climb in temperature, ash is one of the first things to check. Even a little buildup under the charcoal grate can choke the fire.
Cleanout doesn’t need to be a whole project. Just clear the bottom enough that air can move freely. Think of it like trying to breathe through a straw stuffed with paper. That’s what the charcoal feels like when the ash piles up.
You Lit Too Much Charcoal for the Job
This one gets almost everyone at some point.
You’re aiming for 250°F, but you light three or four spots because you want the grill ready faster. The charcoal catches, the ceramic starts storing heat, and fifteen minutes later the dome is cruising way past your target.
A kamado doesn’t cool down quickly. That’s part of its charm, and part of its headache.
Common misconception: A bigger starting fire gives better control. In a kamado, the opposite is often true. Smaller starts are easier to manage.
You Closed the Vents Too Early or Too Late
Shut the vents too early and the fire may stall. Wait too long and the temperature can overshoot.
A good habit is to start dialing the vents back when the cooker is about 25 to 50 degrees below your target temperature. That gives the ceramic time to settle in without blowing right past the number you want.
For example, if you want 250°F, start easing the vents down around 200°F to 225°F. If you wait until the dome already reads 250°F, stored heat may keep pushing it upward.
Did you know? The thermometer can keep rising even after you reduce airflow because the ceramic walls are still heating up.
Your Charcoal Is the Problem
Not all lump charcoal burns the same. Damp charcoal, tiny leftover pieces, or a firebox full of dust can make lighting frustrating.
Good lump should feel dry and solid. A mix of chunk sizes is fine, but if the bag is mostly crumbs, airflow drops and the fire can struggle.
Try to store charcoal in a dry place with the bag sealed or moved to a bin. If the lump hisses, smokes heavily for too long, or goes out easily, moisture may be part of the problem.
The Fire Died Out — or Ran Away
If the fire dies, check three things fast: airflow, charcoal quality, and whether enough lump actually caught before you closed the lid. Open the bottom vent more, stir the charcoal lightly if ash is blocking it, and relight one spot if needed.
If the fire runs hot, don’t panic and don’t keep opening the lid. Closing the lid repeatedly feeds confusion more than it feeds control. Instead, reduce the bottom vent sharply, trim the top vent down, and give the kamado time to respond.
Patience matters here. Kamados react slower than gas grills. The adjustment you make now may not show up for several minutes.
4. FAQ Section
FAQ Section
What is the best way to light a kamado grill?
For most people, starter cubes or wood wool starters are the best choice. They’re simple, affordable, and easy to control. If speed matters most, a propane torch is usually the fastest option. For low-and-slow cooking, light one small area. For high-heat cooking, light two or three spots.
Can you use lighter fluid in a kamado grill?
No, it’s best not to. Lighter fluid can leave unwanted smells on food and create flare-ups inside a tight cooker. Kamado grills work best with natural lump charcoal and clean ignition methods like cubes, wood wool starters, electric starters, torches, or hot-air lighters.
Do you light a kamado grill from the top or the bottom?
Most people light a kamado grill from the top of the charcoal pile, not through the bottom vent. Lighting from the top gives better control over where the fire starts and how fast it spreads. That control matters a lot on a kamado because it holds heat so well.
How long does a kamado grill take to heat up?
It depends on your target temperature and lighting method. In many cases, the charcoal catches in 5 to 15 minutes, and the cooker may need 20 to 40 more minutes to settle into a steady cooking range. High-heat cooks can take longer because the ceramic needs time to fully heat soak.
Why won’t my kamado grill stay lit?
The most common reasons are blocked airflow, damp charcoal, too much ash, or shutting the vents too early. Start by clearing ash, opening the vents more, and making sure you used enough heat to catch a small area of lump before closing the lid.
5. Conclusion
Start small, stay patient, and let your kamado do what it’s built to do. That’s really the whole game.
If you want the easiest path, use a starter cube or wood wool starter. If you want speed, grab a torch. If you want low-and-slow control, light one spot and resist the urge to rush it.
Try one method on your next cook and pay attention to how the grill responds. After a couple of sessions, fire management starts feeling a lot less mysterious. And once you’ve got that part down, the cooking gets a whole lot easier.