Most baby back rib recipes you’ll find online use the popular 3-2-1 method. And sure, it works — for spare ribs. But if you’ve ever tried that same timing on baby backs, you probably ended up with ribs that were mushy, falling apart into a pile of overcooked meat and disappointment. That’s because baby back ribs are leaner and smaller than spare ribs. They don’t need as much time in the smoker. The 2-2-1 baby back ribs method fixes that problem perfectly, giving you ribs that are tender, juicy, and still have a bit of bite right at the bone. Let’s walk through exactly how to nail this technique, what each phase does, and the small details that separate good ribs from the ones your neighbors can’t stop talking about.
What Does 2-2-1 Actually Mean?
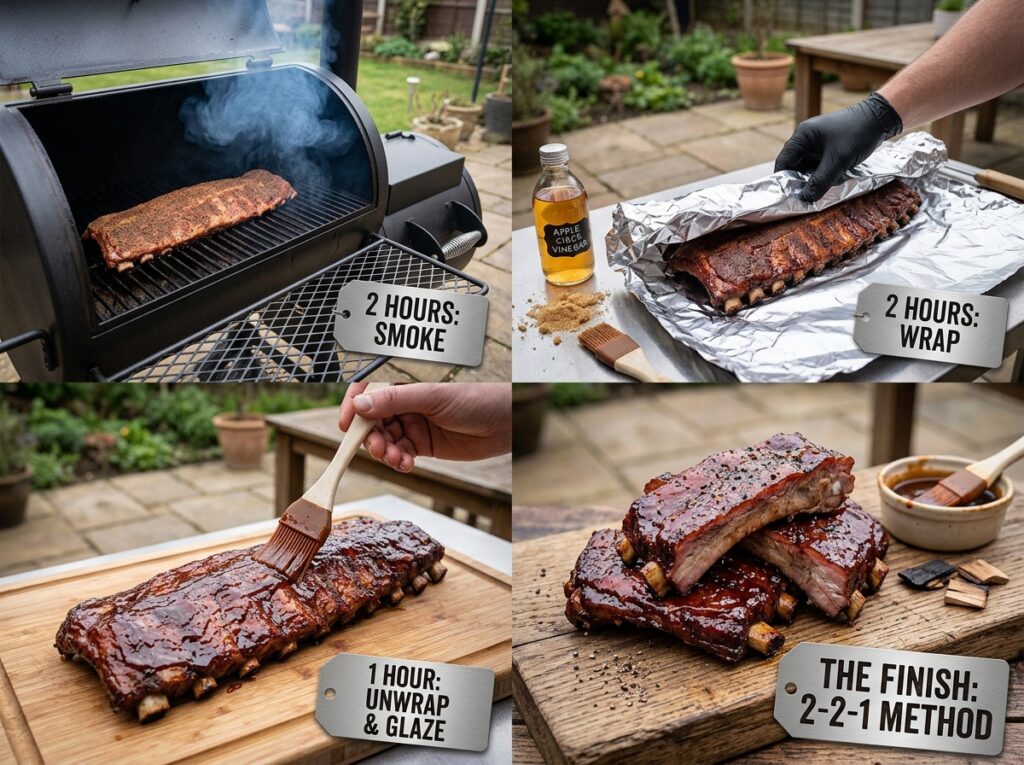
The numbers represent hours, and each number represents a different phase of cooking. Here’s the breakdown:
2 hours — smoke the ribs unwrapped directly on the grill grate. This is where the meat absorbs smoke flavor and develops bark.
2 hours — wrap the ribs in foil (or butcher paper) and continue cooking. This traps moisture and speeds up the tenderizing process.
1 hour — unwrap the ribs, apply your glaze or sauce, and let everything firm up and caramelize.
Total cook time? About 5 hours. That’s a full hour shorter than the 3-2-1 method used for spare ribs, and that difference matters a lot when you’re working with a thinner, more delicate cut like baby backs.
The whole idea behind this timing is simple — baby back ribs come from higher up on the pig’s back, near the spine. They’re naturally more tender than spare ribs and have less connective tissue. Push them past their ideal window, and the meat gets soft to the point where it loses all texture. The 2-2-1 method respects the cut and gives you the sweet spot between tender and toothsome.
What You’ll Need Before You Start
Before we get into the cooking, let’s talk about what you need on hand. Nothing fancy here — just the essentials done right.
The Ribs: Look for a rack of baby back ribs that weighs between 1.5 and 2.5 pounds. If the rack is much heavier, it might actually be spare ribs mislabeled. Check for even meat coverage across the bones. You don’t want a rack where one end is thick and the other is paper thin — that leads to uneven cooking.
The Rub: You can go homemade or store-bought. A solid rib rub typically includes brown sugar, paprika, garlic powder, onion powder, black pepper, chili powder, and a touch of cayenne if you like heat. Apply the rub generously on all sides at least 30 minutes before cooking. Some pitmasters prefer to let the rub sit overnight in the fridge, which does give you a deeper flavor penetration.
The Wood: Fruitwoods like apple and cherry are your best friends for baby back ribs. They produce a milder, slightly sweet smoke that won’t overpower the pork. Hickory works too, but go easy — it can turn bitter if you use too much. If you’re cooking on a pellet grill, your choice of pellet smoker will already make this step easier since pellet grills regulate smoke output pretty well.
The Wrap: Heavy-duty aluminum foil is the classic choice. You’ll also need a liquid for the wrap phase — apple juice, apple cider vinegar, beer, or even a mixture of butter and brown sugar all work great.
The Sauce/Glaze: This goes on during the final hour. Pick your favorite BBQ sauce, or make a simple glaze with honey, butter, and a splash of hot sauce.
A Thermometer: Don’t guess at doneness. A reliable instant-read thermometer will tell you exactly when the ribs are ready. You’re aiming for an internal temp of 195°F to 205°F when they’re done.
Phase 1: The First 2 Hours (The Smoke Phase)
This is where the magic starts. Set your smoker to 225°F. That’s the sweet spot for low-and-slow rib cooking, and it’s the temperature most pitmasters swear by.
Once your smoker is holding steady and producing clean, thin blue smoke, place the ribs bone-side down on the grate. Resist the urge to put them meat-side down — you want the bones to act like a natural heat shield, protecting the meat from direct heat.
During these first two hours, the ribs are absorbing smoke flavor. You’ll start to see the surface of the meat darken and develop what pitmasters call the “bark” — that flavorful, slightly crusty exterior that’s the hallmark of well-smoked meat. The bark forms from the interaction between the rub, the smoke, and the rendering fat on the surface.
Pro Tip: Don’t open the lid constantly to check on the ribs. Every time you lift that lid, you lose heat and smoke. You’re adding 10-15 minutes to your cook each time. Trust the process. If you’re looking, you’re not cooking.
You also don’t need to spritz the ribs during this phase. Some people like to spray with apple juice every 45 minutes, and that’s fine, but it isn’t strictly necessary with baby backs. The wrap phase coming up will handle the moisture game for you.
One thing to watch during this phase: your smoke quality. You want thin, almost invisible blue smoke — not thick white billowing clouds. White smoke means incomplete combustion and will leave a bitter, acrid taste on your ribs. If you’re using a charcoal smoker or offset smoker, make sure your fire is burning clean before the meat goes on.
At the end of these two hours, the ribs will have a beautiful mahogany color. The internal temperature will likely be somewhere around 150°F to 165°F. Don’t worry about that number right now — it’s the final temp that matters.
Phase 2: The Next 2 Hours (The Wrap Phase)
Now things get serious. Pull the ribs off the smoker and lay out two large sheets of heavy-duty foil on your work surface. Place each rack of ribs meat-side down on the foil.
Before you seal the wrap, add your liquid. Pour about ¼ cup of apple juice (or your chosen liquid) over the ribs. Some folks go a step further and add a few pats of butter, a drizzle of honey, and a sprinkle of brown sugar. This creates a braising environment inside the foil that does two important things: it tenderizes the meat faster, and it keeps everything incredibly moist.
Wrap the foil tightly around the ribs. You don’t want any gaps or openings — steam escaping from the packet defeats the whole purpose. Double-wrap if your foil feels thin.
Place the wrapped ribs back on the smoker, still at 225°F, bone-side up this time. Now the ribs are essentially steaming inside that foil packet. The connective tissue — that collagen and fat between the muscle fibers — is breaking down and turning into gelatin. That’s what gives you that tender, pull-from-the-bone texture without the meat falling apart completely.
Quick Fact: Collagen starts breaking down into gelatin at around 160°F, but the process really accelerates between 180°F and 200°F. That’s exactly the temperature range the ribs will be passing through during this wrapped phase.
A question that comes up a lot: should you use butcher paper instead of foil? You can. Butcher paper is more porous than foil, so it lets some moisture escape while still protecting the ribs. The result is slightly firmer bark with a bit less braised texture. Foil gives you more tenderness. Butcher paper gives you more bark. It’s a trade-off, and both produce excellent ribs. Try both and see which one you prefer.
During this phase, you’re not adding any smoke — the foil blocks it. So the smoke flavor you built up in Phase 1 is all you’ll get. That’s exactly why the first two hours are so important.
After two hours in the wrap, the internal temperature should be approaching 195°F or higher. The ribs will feel noticeably more pliable when you pick up the packet (use your grill gloves — that packet is HOT and full of scalding liquid).
Phase 3: The Final Hour (The Glaze Phase)
This last hour is where your ribs go from great to unforgettable.
Carefully unwrap the ribs and place them back on the smoker grate, bone-side down. Now brush on your BBQ sauce or glaze. Don’t drown them — a thin, even coat is all you need. You’ll apply another coat about 30 minutes in, and possibly a third light coat during the last 15 minutes.
What’s happening here? The heat is setting the sauce, caramelizing the sugars, and creating that sticky, glossy finish that looks as good as it tastes. The surface of the ribs is also firming back up after being steamed in the foil. The bark regains some texture, and any excess moisture evaporates.
You can bump the temperature up to 250°F for this last phase if you want more caramelization. Just watch closely — sauces with high sugar content can burn quickly at higher temps.
Pro Tip: If you want competition-style sticky ribs with layers of glaze, apply sauce every 15 minutes during this final hour. Each layer builds on the previous one, creating a thick, lacquered coating.
At the end of this hour, your ribs should have an internal temperature between 195°F and 205°F. But honestly, the best test for doneness isn’t just temperature — it’s the bend test. Pick up the rack from the middle with a pair of tongs. If the ribs bend easily and the meat starts to crack on the surface but doesn’t fall apart, they’re perfect. If the meat tears away and falls off the bone, they went a little too long (still tasty, just not ideal texture).
Let the ribs rest for 10 to 15 minutes before cutting. This lets the juices redistribute. Slice between the bones and serve.
Temperature Control: The Make-or-Break Factor
You can follow the 2-2-1 timing perfectly and still end up with mediocre ribs if your temperature isn’t consistent. A smoker that swings between 200°F and 275°F throughout the cook will throw off everything — the bark development, the collagen breakdown, the moisture levels.
225°F is the gold standard. Some pitmasters run baby backs at 250°F and adjust the timing down slightly (maybe 1.75-1.75-0.75), and that works fine too. But if you’re new to this method, stick with 225°F for the full five hours. It’s more forgiving.
Different types of smokers handle temperature stability differently. Pellet grills tend to hold temperature very consistently because they use electronic controllers. If you’re using a pellet grill, you can pretty much set it and forget it. Charcoal and offset smokers require more babysitting — you’ll need to manage your vents and fuel throughout the cook.
A wireless meat thermometer is incredibly useful here. You can monitor the smoker’s ambient temperature and the meat’s internal temp from your phone without opening the lid every 20 minutes.
2-2-1 vs. 3-2-1: Which Method Should You Use?
This is probably the most common question people ask. And the answer is straightforward — it depends on what kind of ribs you’re cooking.
The 3-2-1 method was designed for spare ribs. Spare ribs are bigger, fattier, and have more connective tissue. They need that extra hour of smoke time and extra hour of wrapping to break everything down properly.
Baby back ribs are smaller and leaner. They simply don’t need as long. If you use the 3-2-1 method on baby backs, you’ll almost certainly overcook them. The meat will be mushy and fall off the bone in a way that feels more like pulled pork than ribs. Some people actually prefer that ultra-tender style, and if that’s you, go for it. But most BBQ enthusiasts — and virtually all competition cooks — agree that the ideal rib has meat that pulls cleanly from the bone with a gentle tug, not meat that slides off when you pick the rib up.
If you’re not sure whether you’ve got baby backs or spare ribs, check out this comparison of beef ribs vs. pork ribs for a deeper understanding of different rib cuts and how they behave on the smoker.
Troubleshooting Common Problems
Even with a solid method, things can go sideways. Here’s what to do when they do.
Ribs are tough and chewy after 5 hours. Your smoker was probably running too low. If your temperature dipped below 200°F for extended periods, the collagen didn’t fully break down. Wrap the ribs back up in foil, put them back on at 225°F, and give them another 30-45 minutes.
Ribs are falling apart and mushy. You either ran too hot or left them in the wrap too long. Pulling back the wrapped time by 15-30 minutes next time should fix this. Also check that your smoker isn’t running hotter than you think — use a separate thermometer to verify the built-in gauge.
No smoke ring. A smoke ring is that pink layer just beneath the surface of the meat. It’s caused by a chemical reaction between nitrogen dioxide from the smoke and myoglobin in the meat. If you don’t get one, it usually means the smoke exposure in Phase 1 wasn’t sufficient, or you’re cooking on a pellet grill (which tends to produce less visible smoke ring). Regardless, the smoke ring is purely cosmetic — it doesn’t affect flavor at all.
Bark is too soft. This usually happens when there’s too much moisture in the smoker. Keep a dry cooking environment. Also, make sure you’re not wrapping too early — the bark needs time to set during the first two hours.
Sauce is burning. Lower your temperature during the final phase, or apply the sauce later — during the last 30 minutes instead of the full final hour.
What to Serve with Your Ribs
Great ribs deserve great sides. Coleslaw, cornbread, baked beans, mac and cheese, potato salad — these are the classics for a reason. If you’re looking for fresh ideas beyond the usual lineup, we’ve put together a list of the best BBQ side dishes that pair perfectly with smoked ribs.
One practical tip: prep your sides during Phase 2 (the wrap phase). That’s the most hands-off part of the cook. Your ribs are sealed up and doing their thing — use that two-hour window to get everything else ready.
FAQ
What’s the ideal temperature for 2-2-1 baby back ribs?
Keep your smoker at 225°F for the entire cook. You can bump it to 250°F during the last hour for better sauce caramelization, but 225°F is the most reliable temperature for consistent results. The ribs are done when they reach an internal temperature between 195°F and 205°F.
Can I use the 2-2-1 method on a gas grill?
Yes, but you’ll need to set it up for indirect heat. Light one burner and place the ribs on the unlit side. Add a smoker box with wood chips for smoke flavor. Temperature control will be trickier than on a dedicated smoker, so keep a close eye on your thermometer.
Do I have to wrap the ribs, or can I skip the foil?
You can absolutely cook ribs without wrapping — plenty of pitmasters do. Skipping the wrap gives you firmer bark and a more pronounced smoke flavor, but the ribs will take longer to tenderize and you’ll lose some moisture. If you skip the foil, plan on about 5-6 hours total at 225°F and spritz the ribs every 45 minutes to keep them from drying out.
How do I know when baby back ribs are done without a thermometer?
The bend test is your best friend. Pick up the rack with tongs from the center. If the meat cracks on the surface and the rack bends easily but doesn’t break apart, they’re done. You can also twist a bone — if it turns freely with little resistance, the meat is ready.
Should I remove the membrane from the back of the ribs?
Yes. That thin, papery membrane on the bone side of the rack doesn’t render down during cooking. It stays tough and chewy, and it also blocks rub and smoke from penetrating the meat. Slide a butter knife under the membrane at one end, grab it with a paper towel for grip, and peel it off in one piece.
Fire Up the Smoker
The 2-2-1 baby back ribs method isn’t complicated, but it rewards attention to detail. Get your temperature right, don’t skip the wrap, and give that final glaze the time it needs to set — and you’ll pull ribs off the smoker that rival anything from a top BBQ joint.
If this is your first time smoking ribs, start here. Follow the timing, trust the process, and take notes on what you’d tweak next time. Every smoker behaves a little differently, and every rack of ribs is slightly unique. After two or three cooks, you’ll have your own version of this method dialed in perfectly — and that’s when things get really fun.